Reactions
Reacting to messages
One of the first things many people want to know is how to react with emojis, both custom and "regular" (unicode). There are different routes you need to take for each of those, so let's take a look at both.
Here's the base code we'll be using:
const Discord = require('discord.js');
const client = new Discord.Client();

client.once('ready', () => {
	console.log('Ready!');
});

client.on('message', message => {
	// ...
});

client.login('your-token-goes-here');
Unicode emojis
To react with a unicode emoji, you will need the actual unicode character of the emoji. There are many ways to get a unicode character of an emoji, but the easiest way would be through Discord itself. If you send a message with a unicode emoji (such as :smile:, for example) and put a \ before it, it will "escape" the emoji and will display the unicode character instead of the normal emoji image.

To actually react with an emoji, you need to use the message.react() method. Once you have the emoji character, all you need to do is copy & paste it as a string inside the .react() method!
if (message.content === '!react') {
	message.react('😄');
}

Custom emojis
For custom emojis, there are actually multiple ways of reacting. Like unicode emojis, custom emojis can also be escaped. However, when you escape a custom emoji, the result will be different.
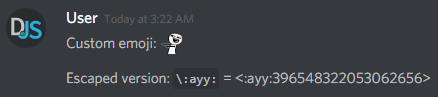
This format is essentially the name of the emoji, followed by its ID. Copy & paste the ID into the .react() method as a string.
if (message.content === '!react-custom') {
	message.react('396548322053062656');
}

Great! This route may not always be available to you, though. Sometimes you'll need to react with an emoji programmatically. To do so, you'll need to retrieve the emoji object.
Two of the easiest ways you can retrieve an emoji would be:
- Use
.find()on a Collection of Emojis. - Use
.get()on theclient.emojisCollection.
TIP
It is possible for two or more emojis to have the same name, and using .find() will only return the first entry it finds. As such, this can cause unexpected results.
Using .find(), your code would look something like this:
if (message.content === '!react-custom') {
	const emoji = message.guild.emojis.find('name', 'ayy');
	message.react(emoji);
}
Using .get(), your code would look something like this:
if (message.content === '!react-custom') {
	const emoji = client.emojis.get(config.emojiID);
	message.react(emoji);
}
Of course, if you already have the emoji ID, you should just put that directly inside the .react() method. But if you want to do other things with the emoji data later on (e.g. display the name or image URL), it's best to retrieve the full emoji object.
Reacting in order
If you just put one message.react() under another, it won't always react in order as is. This is because .react() is a Promise, and as such, an asynchronous operation.
if (message.content === '!fruits') {
	message.react('🍎');
	message.react('🍊');
	message.react('🍇');
}

As you can see, if you leave it like that, it won't display as you really want it to. It was able to react correctly on the first try, but reacts in a different order each time after that.
Luckily, there are two easy solutions to this. The first would be to to chain .then()s in the order you want it to display.
client.on('message', message => {
	if (message.content === '!fruits') {
		message.react('🍎')
			.then(() => message.react('🍊'))
			.then(() => message.react('🍇'))
			.catch(() => console.error('One of the emojis failed to react.'));
	}
});
The other would be to use the async/await keywords.
// notice the `async` keyword
client.on('message', async message => {
	if (message.content === '!fruits') {
		try {
			await message.react('🍎');
			await message.react('🍊');
			await message.react('🍇');
		} catch (error) {
			console.error('One of the emojis failed to react.');
		}
	}
});
If you try again with either of the codeblocks above, you'll get the result you originally wanted!

TIP
If you aren't familiar with Promises or async/await, you can read more about them on MDN or our guide page on async/await!
However, if you don't mind the order the emojis react in, you can take advantage of Promise.all(), like so:
if (message.content === '!fruits') {
	Promise.all([
		message.react('🍎'),
		message.react('🍊'),
		message.react('🍇'),
	])
		.catch(() => console.error('One of the emojis failed to react.'));
}
The benefit of this small optimization is that you can use .then() to handle when all of the Promises have resolved, or .catch() when one of them has failed. You can also await it since it's a Promise itself.
Awaiting reactions
A common use case for reactions in commands is having a user confirm or deny an action, or creating a poll system. Luckily, we actually already have a guide page that covers this! Check out that page if you want a more in-depth explanation. Otherwise, here's a basic example for reference:
message.react('👍').then(() => message.react('👎'));

const filter = (reaction, user) => {
	return ['👍', '👎'].includes(reaction.emoji.name) && user.id === message.author.id;
};

message.awaitReactions(filter, { max: 1, time: 60000, errors: ['time'] })
	.then(collected => {
		const reaction = collected.first();

		if (reaction.emoji.name === '👍') {
			message.reply('you reacted with a thumbs up.');
		} else {
			message.reply('you reacted with a thumbs down.');
		}
	})
	.catch(collected => {
		console.log(`After a minute, only ${collected.size} out of 4 reacted.`);
		message.reply('you didn\'t react with neither a thumbs up, nor a thumbs down.');
	});
Listening for reactions on old messages
WARNING
This section describes how to use some undocumented APIs to add unsupported functionality into discord.js, and as such you should follow anything here with extreme caution. Anything here is subject to change at any time without notice, and may break other functionality in your bot.
If you've tried using the messageReactionAdd or messageReactionRemove events before, you may have noticed that it doesn't always emit. That's because these events only trigger for cached messages. Fortunately, there is a way to make those events trigger for all messages.
In order to make that happen, you'll need to listen to a completely different event and emit the messageReactionEvent yourself. The name of the event you'll need to listen to is raw, and it has a single parameter.
WARNING
Due to the raw event being undocumented and unsupported feature, all of the following code will be a basic example and may not cover all cases.
client.on('raw', event => {
	console.log('\nRaw event data:\n', event);
});
The raw event listens for all client events and returns a set amount of data. If you look at as is, it might look a bit like gibberish to you, but that's okay because you'll only need to know about two of the properties it contains.
After your ready event triggers, try adding a reaction to any message right after. You should see something like this in your console:
 { t: 'MESSAGE_REACTION_ADD',
  s: 4,
  op: 0,
  d:
   { user_id: '208330347295932416',
     message_id: '396565776955342849',
     emoji: { name: '😄', id: null, animated: false },
     channel_id: '396535748360404994' } }
The only two properties you'll need to worry about are t and d. t is the raw event name (a list of them can be found here), and d is the data that Discord is sending to your client. So how can you make use of this info? Let's take a look at that.
Emitting the event(s) yourself
Before anything, add two regular messageReactionAdd and messageReactionRemove events in your file. This will serve as proof that you'll be able to listen to any reaction addition/removal and execute your code accordingly.
client.on('messageReactionAdd', (reaction, user) => {
	console.log(`${user.username} reacted with "${reaction.emoji.name}".`);
});

client.on('messageReactionRemove', (reaction, user) => {
	console.log(`${user.username} removed their "${reaction.emoji.name}" reaction.`);
});
Send a messsage, restart your bot, and add a reaction to the message you just sent. You'll notice that the messageReactionAdd event doesn't trigger, but the raw event does. If you send a new message and react to that one, the messageReactionAdd should trigger then. This is because one isn't cached (the old one) and the other is (the new one).
Since the raw event gives you just enough data to work with, you can build up the proper objects and emit the other events yourself. First, replace your entire raw event with this:
const events = {
	MESSAGE_REACTION_ADD: 'messageReactionAdd',
	MESSAGE_REACTION_REMOVE: 'messageReactionRemove',
};

client.on('raw', async event => {
	if (!events.hasOwnProperty(event.t)) return;

	// ...
});
This will prevent your code from trying to build data that isn't relevant to that event. Next, you should make use of the d property. Since it gives you a channel, user, and message ID, you can fetch the proper objects for those.
const { d: data } = event;
const user = client.users.get(data.user_id);
const channel = client.channels.get(data.channel_id) || await user.createDM();

if (channel.messages.has(data.message_id)) return;

const message = await channel.fetchMessage(data.message_id);
The if statement in the middle plays an important role; it prevents us from re-emitting the event for both uncached and cached messages. Without this, your reaction events would execute twice for a single reaction if the message was already cached.
A custom emoji contains both a name and an ID, while a unicode emoji contains just a name. Since custom emoji reactions are keyed in a name:ID format and unicode emoji reactions are keyed by their name, you'll have to do something like this to set the right emoji for this event:
const emojiKey = (data.emoji.id) ? `${data.emoji.name}:${data.emoji.id}` : data.emoji.name;
We are checking for emoji.id because a unicode emoji won't have an ID inside the emoji object. Next we are using template literals to combine the name and the ID to construct the proper key format name:ID we need to get the custom emoji reaction.
All that's left is to fetch the actual reaction from the message and emit the event.
const reaction = message.reactions.get(emojiKey);
TIP
In the master branch/v12, reactions are keyed by their ID or name only, not in a name:ID format.
After that, simply emit the event with the proper data you've built up.
client.emit(events[event.t], reaction, user);
If you managed to get cannot read property emoji of undefined when testing, then that means you removed the last reaction in the message, so there was nothing to retrieve from message.reactions. What you should do is create a temporary object that can be passed through the event as if nothing ever happened. Simply adjust the last few lines like so:
let reaction = message.reactions.get(emojiKey);

if (!reaction) {
	// Create an object that can be passed through the event like normal
	const emoji = new Discord.Emoji(client.guilds.get(data.guild_id), data.emoji);
	reaction = new Discord.MessageReaction(message, emoji, 1, data.user_id === client.user.id);
}

client.emit(events[event.t], reaction, user);
TIP
In the master branch, you can avoid that mess by applying this fix instead.
And you're done! If you send a message, restart your bot, and react to that message, your messageReactionAdd and messageReactionRemove events should log as normal.
Resulting code
If you want to compare your code to the code we've constructed so far, you can review it over on the GitHub repository here .